
Step 1 of 5
Install Android Studio
Goal Install Android Studio, Rabbit 2 or newer, until its Welcome window opens.
- At home developer.android.com/studio
- Android Studio Setup Wizard
-
The installer, on your PC.
- In your browser, open developer.android.com/studio.
- Download Android Studio from that page.
- Run the file you downloaded: the Android Studio installer opens.
-
Android Studio, installed.
- Click Next on each page, keeping what it proposes, until the button reads Install.
- Click Install.
- When the installation ends, click Next.
- Click Finish: Android Studio starts.
-
Its first setup: Standard, and every licence accepted.
- The Setup Wizard opens: click Next.
- Click Standard.
- Click Next until the page License Agreement shows.
- On License Agreement, click the first licence of the list, then Accept.
- Do the same for each other licence of the list: click it, then Accept.
-
Android’s tools, downloaded.
- Click Finish: the wizard downloads Android’s tools, for several minutes.
- When the download ends, click Finish again.
-
The Welcome window, without an account.
- A Sign in to Android Studio window opens: click Skip for now. The Welcome to Android Studio window opens.

- More Actions: then Virtual Device Manager, for the phone (0.2).
- New Project: your Notes project starts here (0.3).
Done I see the Welcome to Android Studio window.
Stuck? 2 symptoms
- Finish stays grey on License Agreement A licence of the list is not accepted yet. Click each one in turn, then Accept.
- An older Android Studio is already installed Update it: the lab’s projects need Rabbit 2 or newer.
No project file yet: Android Studio writes the whole project at step 0.4.
Step 2 of 5
Create the virtual phone
Goal Create the lab’s phone, a Pixel 7 with Android 17 (API 37), and start it.
- Android Studio Virtual Device Manager
- Emulator Android Emulator - Pixel_7:5554
-
The hardware profile: a Pixel 7.
- In the Welcome window, click More ActionsVirtual Device Manager.
- A Device Manager window opens: click its +.
- Add Device opens on Phone: click Pixel 7 (33+, 1080 × 2400), not Pixel 7 Pro or Pixel 7a.
- Click Next.

- Pixel 7: the hardware profile.
- Width × Height: 1080 × 2400 pixels.
- Density: 420 dpi, the pixels per inch.
-
The system image: Android 17.
- Configure virtual device opens. Keep what it proposes: Name
Pixel 7, API 37.0, Google Play Store, the selected image. - Click Finish.

- Name:
Pixel 7. - API: API level 37 is Android 17.
- Services: Google Play Store.
- The download icon: this image is not on your PC yet (2.1 GB).
- Configure virtual device opens. Keep what it proposes: Name
-
The image, downloaded: 2.1 GB.
- Confirm Download opens: click Yes.
- An SDK Quickfix Installation window downloads it. When it ends, click Finish.

- Yes: the download starts.
- Add Device the hardware profile: Pixel 7, 1080 × 2400 pixels, 420 dpi
- Configure virtual device the system image: Android 17 (API 37), 2.1 GB
- A virtual phone “Pixel 7”, in its own window or in Running Devices
A virtual phone = a hardware profile + a system image. Another size reuses the image: no download. Another Android version is a new image, 1 to 2 GB. The API level is Android’s version number for developers: API 37 is Android 17, API 24 is Android 7. -
The phone, started once.
- Back in Device Manager, click ▶ on the Pixel 7 row.
- After about a minute, the phone opens in its own window, Android Emulator - Pixel_7:5554.
- When its home screen shows, click the window’s ×: step 0.5 restarts it in the project.

You should see The phone’s home screen.
Done I see the phone’s home screen.
Stuck? 3 symptoms
- No More Actions: the Welcome window lists your projects Click ⋮, next to Clone Repository, then Virtual Device Manager.
- The emulator says it cannot use acceleration Turn on Windows Hypervisor Platform in Windows Features, then restart the PC. Same message after the restart: turn on virtualization (Intel VT-x, or SVM on AMD) in the PC’s BIOS/UEFI.
- A licence page appears during the download Accept it, then go on.
No project file yet: the phone lives outside any project.
Step 3 of 5
Start a project with No Activity
Goal Start from No Activity, the template that writes no screen: you write the first one in Part 2.
- Android Studio New Project
-
A project with no screen yet.
- In the Welcome window, click New Project.
- A New Project window opens: click the category Phone and large screens.
- Click the template No Activity, not Empty Activity: that one makes a Compose project, for Lab 2.
- Click Next: the form of step 0.4 opens.

- Phone and large screens: the category.
- No Activity: the template to choose.
- Empty Activity: a Compose project (Lab 2), not this one.
Stuck? 2 symptoms
- You chose Empty Activity It makes a Compose project, for Lab 2. Create the project again with No Activity.
- Phone and Tablet, not Phone and large screens This Android Studio is older than Rabbit 2. Update it, then start again.
No project file yet: the next step writes them.
Step 4 of 5
Fill in the form
Goal Create the Notes project in Java, with your own package name.
- Android Studio New Project › No Activity
-
Your package name, on this page first.
- Choose your package name:
com.yourname.notes, with your own name, in lowercase, with no hyphen. - Type it in the field below.
Without JavaScript, the code says com.yourname.notes: replace yourname by the name you chose.
- Choose your package name:
-
The form: Notes, your package, Java, API 24.
- In Name, select the text with Ctrl+A, then type
Notes. - In Package name, select the text with Ctrl+A, then type your own package, the one in the field above:
com.yourname.notes. - In Save location, keep the folder it proposes:
C:\Users\you\.AndroidStudioProjects\ Notes - In Language, choose Java: the list starts on Kotlin.
- In Minimum SDK, choose API 24 (Android 7.0).
- Click Finish.
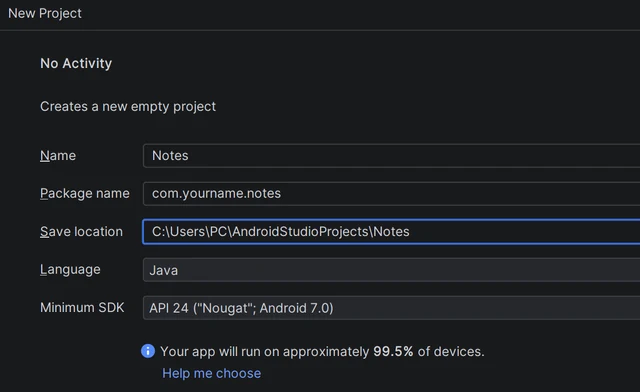
- Package name:
com.yourname.notes, with your own name. - Save location: keep the proposed folder,
C:\Users\you\.AndroidStudioProjects\ Notes - Language: Java (the list starts on Kotlin).
- Minimum SDK: API 24 (Android 7.0).
- In Name, select the text with Ctrl+A, then type
-
Android Studio, open on Notes.
- A window downloads Android SDK Platform 37? Wait, then click Finish.
- The project opens, an Agent window on the right: click its button, the lit one on the right bar, to close it.
- A balloon, Microsoft Defender may affect IDE, may appear: ignore it.

- Agent: it opens by itself the first time. This lab uses no AI.
- Its button on the right bar: click it to close the window.
Why Keep Notes exactly: the theme takes its name, and the files you paste later expect it.
Done I see app and Gradle Scripts in the Project window.
Stuck? 4 symptoms
- “The path 'C:\' is not writable. Please choose a new location.” You typed a folder at the root of
C:. Keep the folder the form proposes. - No
appin the Project window yet The first time, Android Studio downloads Android SDK Platform 37 and prepares the project: 1 to 3 minutes. Wait; click Finish if a window asks. - Kotlin was left selected: the project holds
.ktfiles Delete the project’s folder, then create the project again, in Java. - The package starts with
com.example, or holdsyournameCreate the project again. Chapter 02 shows why the name matters: it is the app’s identity on the phone.
No file of yours yet: Android Studio wrote the whole project. Part 1 shows you around it.
Step 5 of 5
Build once, and keep your ticket
Goal Build the project once, and keep a screenshot: your entry ticket for the first session.
- Android Studio Device Manager · Build
- Emulator Running Devices
-
The phone, inside the project.
- Click Device Manager, its icon on the window’s right edge.
- The Device Manager panel opens: click ▶ on the Pixel 7 row.
- The phone opens in Running Devices, in the tab Pixel 7 API 37.0: wait for its home screen.
-
A first build.
- Click BuildMake Project, or press Ctrl+F9.
- A balloon, “Build Analyzer detected new build performance issues”, may point at the hammer, bottom left: ignore it.
-
Its result, in the Build window.
- The Build window stays closed: click its hammer icon, Build, at the bottom left.
- In Build Output, wait for
BUILD SUCCESSFUL. Ignore the line New Minor Gradle Version Available.

- Build (the hammer): opens the Build window if it stays closed.
- Build Output:
BUILD SUCCESSFUL in 8s. - Project:
appandGradle Scripts. - Running Devices: the phone, Pixel 7 API 37.0.
-
Your entry ticket: a screenshot of the whole window.
- Press Win+Shift+S: the screenshot bar opens at the top of the screen.
- In that bar, click the window mode.
- Click the Android Studio window.
- A notification appears at the bottom right: click it. The Snipping Tool window opens.
- Press Ctrl+S: a Save As window opens.
- Click Save: your ticket is saved.
You should see BUILD SUCCESSFUL in …s in Build Output, on your screenshot too.
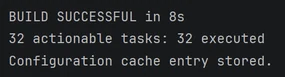
Done I have my screenshot: the project, BUILD SUCCESSFUL and the phone.
Stuck? 4 symptoms
- No Device Manager icon on the right edge Open it with ViewTool WindowsDevice Manager.
- The phone opened in its own window, not in Running Devices You started it from the Welcome window. Close that window, then start it from the project’s Device Manager.
- No Build menu On a narrow window, the last menus fold behind >, at the end of the menu bar. Click it.
- A balloon: “Build Analyzer detected new build performance issues” It points at the hammer. It is not an error: ignore it.
No file changes in this step: the build only reads the project.
End of the part
Recap
Every download is done. In class, you reopen Notes, start the phone and write code.
- install Android Studio;
- create a virtual phone, and say its size and its Android version (its API level);
- create a Java project with your own package name.